What we want:
- Https for internally deployed applications
- Application cannot be exposed externally
- Adding new applications should be easy
- Only needing to trust one certificate, even for multiple applications
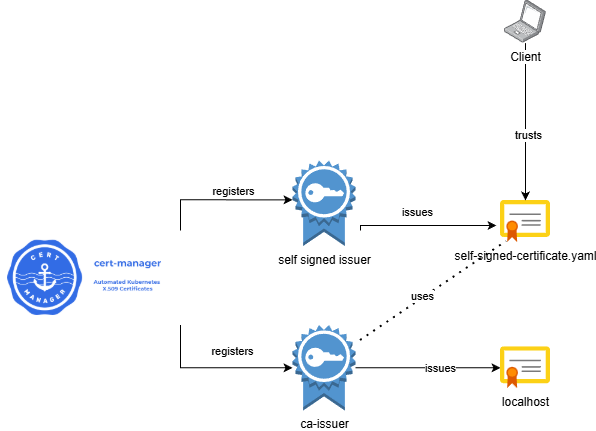
The solution
Use cert-manager to create a self signed CA and use that CA to create self signed certificates:
Installing prerequisites
First we will install cert-manager with helm:
helm repo add jetstack https://charts.jetstack.io --force-updatehelm install cert-manager jetstack/cert-manager --namespace cert-manager --create-namespace --version v1.19.1 --set crds.enabled=true
Creating our CA certificate
Next up we need to create a cluster issuer which issues certificates by using the self signed mechanism, this will just be used to create our CA certificate.
Apply the manifest with:
kubectl apply -f self-signed-issuer.yaml
Now we will make the CA certificate with our self signed issuer:
Apply the manifest with:
kubectl apply -f ca-certificate.yaml
After this step, we can see that a secret is generated. Verify by using the following command:
kubectl describe secret ca-secret -n cert-manager
Creating a new issuer which uses the CA certificate
Now that we have a self signed certificate that can act as our CA certificate, we can use it to make a new ClusterIssuer. Let's create it:
Apply the manifest with:
kubectl apply -f ca-issuer.yaml
Let's deploy a sample application
Apply the following files to deploy a simple nginx application:
kubectl apply -f namespace.yamlkubectl apply -f configmap.yamlkubectl apply -f deployment.yamlkubectl apply -f service.yaml
Let's verify if our pod is running
kubectl get pods -n deployment-example
Our last step is to create an ingress and use our cluster-issuer
Apply the manifest with:
kubectl apply -f ingress.yaml
We are now able to verify if a secret exists for localhost with the following command:
kubectl describe secret localhost-tls-secret -n deployment-example
If we now go to the page we defined: https://localhost/example then you will see that the certificate related to this page is issued by ca-certificate
=> This means that if we trust this CA certificate, all certificates generated from that CA are now automatically trusted as well
Summary
Advantages
- Very simple setup
- We only need to trust one certificate
Drawbacks
- Certificate expiry means trusting new certificate (you can use long lived CA's, but it is bad practice)
- We don't rely on the ACME challenge
- A private CA like Hashicorp Vault makes management easier, but requires more setup work